目次
Introduction
Hi everyone, this is Mohamed Alomar from GeekFeed.
This blog covers the process of creating React docker container on Windows machine, and then transferring that container to Ubuntu server through secure server-client synchronized connection.
Prerequisites
Before we start, make sure you have the following applications and packages are installed on your Windows 10 machine:
- docker 20.10.8
- node v14.15.4(or later version)
- npm7.20.1(or later version)
also you will need to have:
Ubuntu 20.04 Server running Edition
In this blog I use Alibaba Clouding provider to get running Ubuntu kernel , but of course you are free to choose whatever clouding provider you wish.
Getting started
Installing create-react-app command
Open Windows terminal and run the following command,
|
1 |
npm install -g create-react-app |
Creating new React application
|
1 2 3 |
npx create-react-app blog cd blog npm start |
Creating a Production build folder of our app
By executing the following command, build folder will be generated, this folder is used during the process of putting our React app for production.
|
1 |
npm run build |
Set up Docker files
Add following files to the root folder of our application
docker-compose file
|
1 2 3 4 5 6 7 8 9 10 11 12 13 14 15 16 17 18 19 20 21 22 23 24 25 26 27 |
version: "3.7" services: react: container_name: react build: context: . dockerfile: app.docker ports: - "3000:3000" volumes: - ".:/app" - "/app/node_modules" environment: - NODE_ENV=development web: container_name: nginx_server build: context: ./ dockerfile: web.dockerfile volumes: - ./build:/var/www/html - ./nginx.conf:/etc/nginx/conf.d/default.conf ports: - 80:80 depends_on: - react |
app.docker file
|
1 2 3 4 5 |
FROM node:alpine WORKDIR /app COPY package.json /app/package.json RUN npm install CMD ["npm", "start"] |
web.docker file
|
1 |
FROM nginx:1.10-alpine |
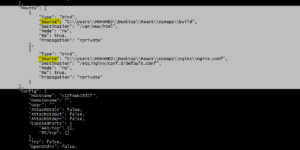
nginx.conf
|
1 2 3 4 5 6 7 8 9 10 11 12 |
server { listen 80; location / { root /var/www/html; index index.html index.htm; try_files $uri $uri/ /index.html; } error_page 500 502 503 504 /50x.html; location = /50x.html { root /usr/share/nginx/html; } } |
Run the Docker container
In the root folder, run the following command
|
1 |
docker-compose up -d |
the previous command will build our docker container that consists of two docker images:
- app docker image.
- web docker image.
docker commit
In order to transfer and run our docker container on Ubuntu server, we should have the physical file of that container, so it can be transferred via rsync command which we will explain about it in next section of this blog.
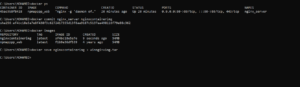
In order to get that file, run the next commands
|
1 |
docker ps |
docker ps will display list of all running containers with their IDs.
Note: since the purpose of this blog is to ship React app to Ubuntu server only for production(not to save the entire React application files), then we will ship only nginx_server container to Ubuntu.
Therefore, choose the id of nginx_server container which we have already created and run the following :
|
1 |
docker commit nginx_server_ID |
docker save
after running the previous command, new image will be added to docker list of images, this image is built based on nginx_server container.
|
1 |
docker images |
the previous command will list up all docker images you have on your Windows machine, choose the image name that we have just created and run the following to get tar file that has inside of it the physical file of nginx_server container.
|
1 |
docker save commited_container_image_name > compressed_container.tar |
the entire process will be something like this:
Container volumes :
Preparing our container for migration is not enough to get it running on Ubuntu, there are some folders and files on local storage of Windows were bounded to nginx_server container during container creation process, and these files and folders are being used by nginx_server container as it is running, so we have to share a copy of these files and folders with Ubuntu server.
to get names and physical locations of these files and folders
run the following command:
|
1 |
docker inspect container_name |
These are the two files that we need to copy over to the Ubuntu server, to make sure that Ubuntu server getting the data moving with nginx_server container as well.
Transferring our container and its volumes to Ubuntu
In order to transfer data from Windows machine to Ubuntu securely, we have to establish a secure client-server synchronized connection between these two machines by following the steps below:
Generate key pair connection
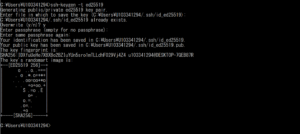
Creating the key pair
on the local terminal of your Windows machine type and run the following command
|
1 |
ssh-keygen -t ed25519 |
a confirmation message will show up to inform you that the generation process has begun, choose the default options without adding passphrase, and you will end up having the required keypair for synchronized connection.
the entire key generation process looks like this:
Copying the public key to Ubuntu server
After generating the key pair you should copy the public key to Ubuntu server while keeping the private connection key on your local Windows.
This can be done using ssh-copy-id command, However, this command is Linux command and not supported by Windows so there is a need to use a third party program like Git bash
after the installation process is completed, navigate the the folder in which your public key resides, open Git bash terminal, and run the following command
|
1 |
ssh-copy-id sammy@your_server_address |
Rsync Command
this command is natively available on Linux and Mac but for Windows you have to install third party program I used in this blog Cygen to run rsync command, and you are free to choose another program to run rsync command on Windows.
note: when installing Cygen there is no need to select all the commands we need to use only:
- rsync 3.2.3
- openssh 8.7p1-1

after the installation process is completed, open Cygen terminal and run the following command
|
1 2 3 |
rsync -r --delete-after --quiet /path/to/build <ssh-user>@<ecs-host>:destination/path/ rsync -r --delete-after --quiet /path/to/nginx.conf <ssh-user>@<ecs-host>:destination/path/ rsync -r --delete-after --quiet compressed_container.tar <ssh-user>@<ecs-host>:destination/path/ |
Loading and running docker container on Ubuntu
ssh to your ubuntu server ,open command prompt and run the following commands:
|
1 2 3 |
apt-get update apt install docker.io docker load -i name_of_container_on_ubuntu.tar |
docker images

Importing and loading the image does not automatically starting the container for you,
so we need use another docker command to run out our loaded image:
|
1 |
docker run -d -v /build:/var/www/html/ -v /nginx.conf:/etc/nginx/conf.d/default.conf --name newName -p 80:80 nginxcontainerimg |

The long number shown on the terminal represents our container ID on Ubuntu and indicates that Docker started our container in the background.
- 【2024】AWS Jr.Championsを振り返る - 2025-07-01
- 中級figma教室 - 2024-12-24
- おすすめガジェット紹介!2024年12月編 - 2024-12-21
- 【Amazon RDS】意図せず突発的な再起動が起こった原因 - 2024-12-19
- Amazon ConnectでNGワードをリアルタイムに検知してSlackに通知する - 2024-12-16
【採用情報】一緒に働く仲間を募集しています