ギークフィードエンジニアの君島です。自己紹介にもある通り、Laravelも始めています。
ギークフィードでは全社的にLaravelを使用した開発を推進しています。
自社サービスのYouWireもLaravelを採用しています。
最近(2019年9月)LTSのLaravel 6がリリースされました。
今後利用する可能性が高いので、Dockerコンテナ上に構築した手順をまとめておきます。
WebサーバにはNginxを使用し、HTTPS通信できるように設定します。
Dockerだけ使いたい、あるいはLaravel 6をCentOS7に構築したいという場合には抜粋して確認してください。
目次
ホストサーバ環境
| ホストOS | CentOS 7.6 |
| Docker | 19.03.2 |
Dockerコンテナ起動
CentOS7イメージの取得
ホストサーバにて以下のコマンドを実行して、centos7のイメージを取得します。
|
1 |
[root@localhost ~]# docker pull centos:centos7 |
コンテナ起動
続いてコンテナを起動するために以下のコマンドを実行します。
|
1 |
[root@localhost ~]# docker run -p 8443:443 --rm --privileged -d -it centos:centos7 /sbin/init |
オプションについて説明します。
-pオプションで、ホストサーバの8443ポートへの通信をコンテナの443ポートへフォワードします。これはSSL化のためです。
実際はiptablesに設定追加していることがわかります。
|
1 2 3 4 |
[root@localhost ~]# iptables -nL DOCKER Chain DOCKER (1 references) target prot opt source destination ACCEPT tcp -- 0.0.0.0/0 172.17.0.2 tcp dpt:80 |
–privileged, /sbin/initはsystemctlコマンドを使用するためです。何も指定しないとsystemctl実行時にFailed to get D-Bus connection: Operation not permittedというエラーが出て実行できないと思います。
それでも実行できない場合は、–security-opt seccomp=unconfinedを追加して、secomp(Secure computing mode)のプロファイルを無視したコマンドも試してください。この設定は、セキュリティ上、dev環境に限定した方が良いとは思います。
|
1 |
[root@localhost ~]# docker run -p 8443:443 --rm --privileged -d -it --security-opt seccomp=unconfined centos:centos7 /sbin/init |
その他のオプションについても、列挙しておきます。
- –rm はクリーンアップ、コンテナ終了時にファイルシステムから削除します。
- -dはデタッチモードで起動、ルートプロセス終了時にコンテナも終了します。
- -itはコンテナの標準出力に入るiと、疑似ターミナルを割り当てるtオプションの混合です。
上記コマンド実行後、コンテナを起動できているかを確認します。
|
1 2 3 |
[root@localhost ~]# docker ps CONTAINER ID IMAGE COMMAND CREATED STATUS PORTS NAMES c5f88da7ae07 centos:centos7 "/sbin/init" 8 seconds ago Up 6 seconds 0.0.0.0:8443->443/tcp compassionate_kowalevski |
コンテナが起動していることがわかりました。
それでは、コンテナに接続して操作を行っていきます。
以下のコマンドを実行してコンテナのコンソールに入ります。{CONTAINER_ID}には、例えばc5f88da7ae07 のようなCONTAINER IDを入力してください。
|
1 |
[root@localhost ~]# docker exec -it {CONTAINER_ID} /bin/bash |
Laravel 6インストール
PHP7.3インストール
ここからはコンテナ上での作業となります。
Laravel 6はPHP7.2以上が要求されているので、まずはPHP7.3をインストールします。
関連して必要なモジュールも合わせてインストールしておきます。
|
1 2 3 |
[root@c5f88da7ae07 /]# yum -y install epel-release [root@c5f88da7ae07 /]# yum -y install http://rpms.famillecollet.com/enterprise/remi-release-7.rpm [root@c5f88da7ae07 /]# yum -y install --enablerepo=remi,remi-php73 php php-devel php-mbstring php-pdo php-gd php-xml php-mcrypt php-fpm php-zip |
Laravel 6インストール
Composerをインストールします。ここではComposerの公式を参考に進めていきます。
|
1 2 3 4 5 |
[root@c5f88da7ae07 /]# php -r "copy('https://getcomposer.org/installer', 'composer-setup.php');" [root@c5f88da7ae07 /]# php -r "if (hash_file('SHA384', 'composer-setup.php') === '544e09ee996cdf60ece3804abc52599c22b1f40f4323403c44d44fdfdd586475ca9813a858088ffbc1f233e9b180f061') { echo 'Installer verified'; } else { echo 'Installer corrupt'; unlink('composer-setup.php'); } echo PHP_EOL;" [root@c5f88da7ae07 /]# php composer-setup.php [root@c5f88da7ae07 /]# php -r "unlink('composer-setup.php');" [root@c5f88da7ae07 /]# mv composer.phar /usr/local/bin/composer |
以下のコマンドを実行してバージョンが表示されたならば成功です。
|
1 2 3 4 5 6 7 8 |
[root@c5f88da7ae07 /]# composer -v ______ / ____/___ ____ ___ ____ ____ ________ _____ / / / __ \/ __ `__ \/ __ \/ __ \/ ___/ _ \/ ___/ / /___/ /_/ / / / / / / /_/ / /_/ (__ ) __/ / \____/\____/_/ /_/ /_/ .___/\____/____/\___/_/ /_/ Composer version 1.9.0 2019-08-02 20:55:32 |
Composerへのパスを通します。
|
1 |
[root@c5f88da7ae07 www]# export PATH=$PATH:$HOME/.composer/vendor/bin |
Composerを使ってLaravelのインストーラをダウンロードします。
|
1 |
[root@c5f88da7ae07 /]# composer global require laravel/installer |
Laravelプロジェクトを開発する場所に移動して、新しいプロジェクトを作成します。
|
1 2 |
[root@c5f88da7ae07 /]# cd /var/www/ [root@c5f88da7ae07 /]# laravel new blog |
新しくblogというディレクトリができあがっているはずです。
この中にLaravel 6のプロジェクトが入っています。
ログやキャッシュの書き込みでPermission Deniedとならないように、パーミッションを変更しておきます。
|
1 2 3 |
[root@c5f88da7ae07 /]# cd /var/www/blog [root@c5f88da7ae07 blog]# find ./ -type d -exec chmod 755 {} \; [root@c5f88da7ae07 blog]# find ./ -type f -exec chmod 644 {} \; |
後でユーザとグループの設定を行いますが、先にWebサーバのインストールに進んでいきます。
Nginxのインストールと各種設定
Nginxインストール
今回Webサーバには、Nginxを使用します。
まずはNginxをインストールします。
|
1 |
[root@c5f88da7ae07 /]# yum -y install nginx |
サービスの起動と有効化をしておきます。
|
1 2 |
[root@c5f88da7ae07 /]# systemctl start nginx [root@c5f88da7ae07 /]# systemctl enable nginx |
Permission Deniedとならないように、Laravelプロジェクトのユーザとグループも変更しておきます。
|
1 |
[root@c5f88da7ae07 /]# chown -R nginx. /var/www/blog |
php-fpm設定
NginxでPHPを使用する場合には、必要なアプリケーションサーバです。
既にPHPのインストールと同時に入れていますので、php-fpmの設定を書き換えましょう。
/etc/php-fpm.d/www.confを、以下のように書き換えます。変更箇所のみ記載しています。
|
1 2 3 4 5 6 7 8 9 10 11 12 13 14 |
;24行目付近 ;user = apache ;group = apache user = nginx group = nginx ;48行目付近 ;listen.owner = nobody ;listen.group = nobody listen.owner = nginx listen.group = nginx ;最下行に追加 listen = /var/run/php-fpm/php-fpm.sock |
こちらもサービスの起動と有効化をしておきます。
|
1 2 |
[root@c5f88da7ae07 /]# systemctl start php-fpm [root@c5f88da7ae07 /]# systemctl enable php-fpm |
HTTPS通信
SSL化するには、適切に証明書をインストールする必要があります。
今回はHTTPSで通信したいだけなので、mod_sslをインストールした際に作られる証明書、鍵ファイルだけを使用します。
|
1 |
[root@c5f88da7ae07 /]# yum -y install mod_ssl |
できあがった証明書と鍵ファイルを適当なパスにコピーしましょう。
|
1 2 |
[root@c5f88da7ae07 /]# cp /etc/pki/tls/certs/localhost.crt /etc/nginx/ [root@c5f88da7ae07 /]# cp -p /etc/pki/tls/private/localhost.key /etc/nginx/ |
Nginx設定
/etc/nginx/nginx.confのデフォルトではコメントアウトされているHTTPS設定を以下のように編集します。
|
1 2 3 4 5 6 7 8 9 10 11 12 13 14 15 16 17 18 19 20 21 22 23 24 25 26 27 28 29 30 31 32 33 34 35 36 37 38 39 |
# 60行目付近 server { listen 443 ssl http2 default_server; listen [::]:443 ssl http2 default_server; server_name _; root /var/www/blog/public; # Laravelプロジェクト直下のpublicを指定 # ssl_certificate "/etc/pki/nginx/server.crt"; # ssl_certificate_key "/etc/pki/nginx/private/server.key"; ssl_certificate "/etc/nginx/localhost.crt"; # 証明書ファイルの指定 ssl_certificate_key "/etc/nginx/localhost.key"; # 鍵ファイルの指定 ssl_session_cache shared:SSL:1m; ssl_session_timeout 10m; ssl_ciphers HIGH:!aNULL:!MD5; ssl_prefer_server_ciphers on; access_log /var/log/nginx/ssl_access.log main; # accessログの追加 error_log /var/log/nginx/ssl_error.log; # errorログの追加 # Load configuration files for the default server block. include /etc/nginx/default.d/*.conf; index index.php index.html index.htm; # indexの指定追加 location / { try_files $uri $uri/ /index.php?$query_string; # locationの指定追加 } error_page 404 /404.html; location = /40x.html { } error_page 500 502 503 504 /50x.html; location = /50x.html { } location ~ .php$ { # .phpの指定追加 fastcgi_pass unix:/var/run/php-fpm/php-fpm.sock; fastcgi_index index.php; fastcgi_param SCRIPT_FILENAME $document_root/$fastcgi_script_name; include fastcgi_params; } } |
設定が終わったら、Nginxを再起動します。
|
1 |
[root@c5f88da7ae07 /]# systemctl restart nginx |
以上で設定は完了となります。
アクセス確認
https://{Host Server IP}:8443にブラウザからアクセスするとLaravelのTOP画面が起動しているはずです。
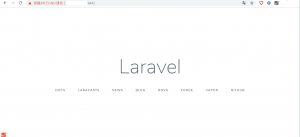
表示されない場合は、上記で設定したNginxのアクセスログや、ポート設定、パーミッションを確認してみましょう。
Laravel 6をCentOS7のDockerに構築するのまとめ
Laravel 6をCentOS7のDockerコンテナ上に構築した手順を紹介しました。
WebサーバをNginxとし、PHP7.3でLaravelが動作するように各種設定を行いました。
- AICC BuilderでConnectのAIコンタクトセンターを生成する - 2026-06-16
- Kiroに公式学習コンテンツがあります~Spirit of Kiro~ - 2025-12-22
- Amazon ConnectでLambdaのDurable Functionsを承認して動してみよう - 2025-12-20
- 【困ってなかった?】AWS CloudShellの700MB縛りがKiro CLIで解かれた - 2025-12-05
- 優しい易しいKiro入門~設定とプラクティスを公開します~ - 2025-12-03
【採用情報】一緒に働く仲間を募集しています